Showing posts with label crafting. Show all posts

October 29, 2013

My DIY Baby Project: Felt Bird Mobile


While some moms make toys, blankets, and even clothes for their babies, I didn't want to spend a lot of time absorbed in projects during my pregnancy. However, I really wanted to make one project for my baby.

I've seen a lot of really cool felt creations around the internet, and I decided to make some felt birds and put them together in a mobile. This was probably not the best project to select because 1) I had never done anything like it before and can't sew well enough to hold a button on securely and 2) I'm a perfectionist. But whether it's because I majored in art in college or because of the do-it-yourself attitude I inherited from my father, I tend to think I can create things using any medium.


My mom is a bird watcher who can identify just about any local bird by sight or sound. As a toddler I learned not what a bird says but what a cardinal says and what a chickadee says. I've taught Nathan to identify the birds we see most commonly around here and look forward to teaching Evan to do the same.


I wanted the birds to be colorful while keeping true to the natural colors of local birds. I also wanted to include black and white patterns to interest a newborn.The birds I selected were the downy woodpecker, chickadee, bluebird, goldfinch, and cardinal. Nathan's favorite bird is the chickadee because of their jubilant "party in the air" way of flying, which I never even noticed until he made the observation. Bluebirds are my mom's favorite birds, and my grandma loved cardinals. It's a family tree of sorts.

I found the patterns for the woodpecker, goldfinch, and chickadee on Downeast Thunder Farm. Their bluebird and cardinal patterns are older and the body shapes didn't seem quite right, so I made my own. (Like I said, perfectionist.)


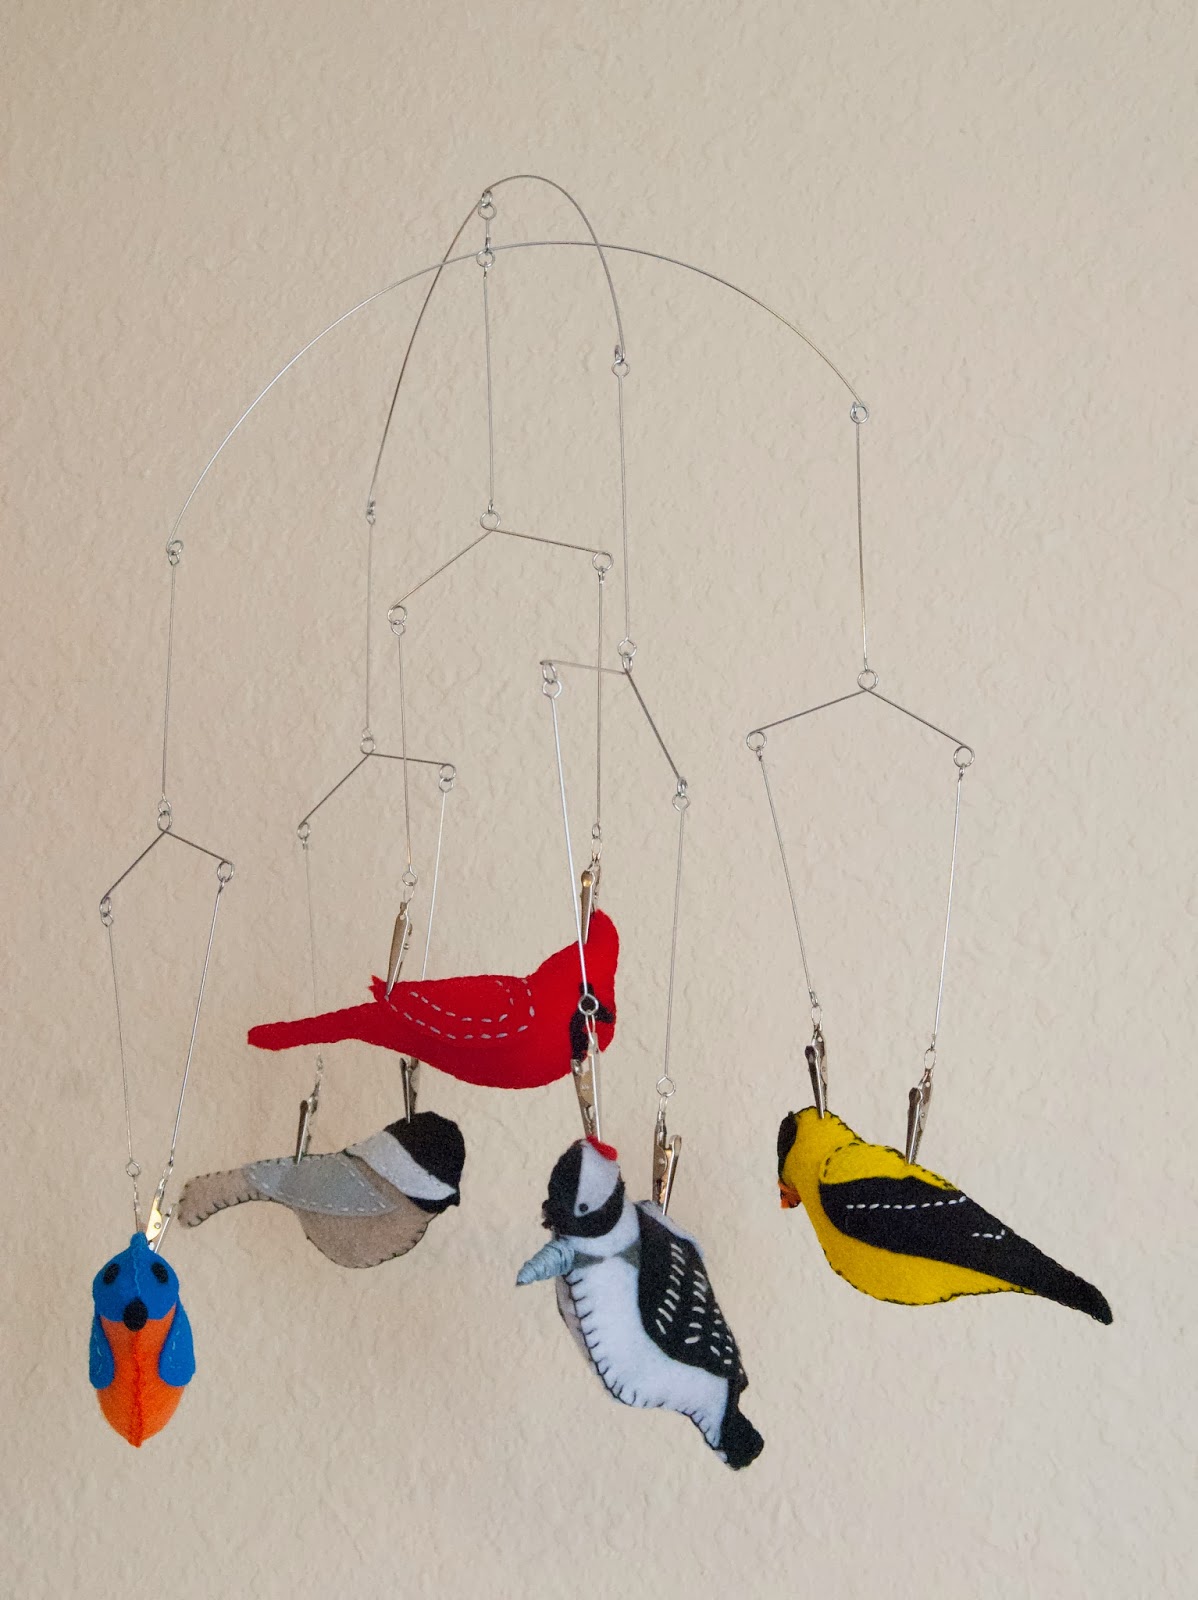
It wasn't until after Evan was born that I finally put them together as a mobile. I'd never made a mobile before either and I wasn't sure how best to do it until I saw the bird mobile Carmen of Life Blessons made for her daughter using a photoclip mobile. Evan was five weeks old at that point, so I decided there's a time to DIY and a time to just get it done and ordered one for my felt birds.

It took a lot of time, effort, and frustration but a lot of love went into it as well. And most importantly, Evan loves it! It hung over the changing table until we moved him into his own room, and then Nathan put it above Evan's bed. Sometimes all I have to do is spin the mobile and he drifts off to take a nap.


Did you do any crafting for your baby? Anyone else have a do-it-yourself problem like I do?

December 6, 2011

Recycled Wedding Invitation Ornament


Wondering what to do with your extra wedding invitations? Or need a Christmas gift for a newlywed? Here's one idea.


One night I was going through my DIY Ideas board on Pinterest and making a list of what I would need to actually make some of the crafts I had pinned. When I came across this invitation ornament, I realized I already had everything I needed and got started right away. I was finished in about an hour.


All you have to do is cut the invitation into strips, curl each strip, and put them inside an empty glass ornament. If you have an X-Acto knife, you can use that for the cutting and then curl the strips around the handle (after removing the blade of course).

Nathan was a little disturbed when he saw me cutting up our wedding invitation, but I assured him it was okay since we still had a bunch of them. Then he reminded me we had gotten rid of all the extras and that was the only one we had left. Oops. Good thing I still have the original files and extra paper.


I realized I never actually blogged about my wedding invitations, so here's what they looked like before I mutilated them.


I actually cut up the entire suite, but I ended up just using the strips from the invitation and a few of the more interesting ones from the other pieces. The ornament was plenty full.


It fits right in with all the other mismatched ornaments. Our tree looks mostly the same as it did last year.


I wanted to buy one new Hallmark ornament this year, and we picked out Tom and Jerry.


Another change is that we're using Bob and Larry as our tree topper this year. Maybe someday I'll buy or make a real tree topper, but it's kind of fun to decide what to put on top as we're decorating it.

Did you do anything with your wedding invitation?


RomanceOnADime.com

August 29, 2011

What to Do with Greeting Cards: My DIY Wedding Card Album

What do you do with all the cards you get for your wedding? Up until recently, our cards just sat in the card box we used at our wedding. I suppose you don't have to keep them, but I want to be able to remember those who gave us well wishes for our marriage, especially since some wrote out their own personalized messages.


I had considered getting a couple of these nice greeting card albums but decided against it since we had such a variety of card sizes. One card is too big to fit in a sleeve, and I thought the tall skinny cards would look odd in them. Plus, $48 for the two we would need seemed a little pricey.


I also like how T.K. at My Orderly Chaos cut her cards in half before putting them in her album, saving the inside messages and the nicer fronts.


When I saw this image in an article on Simple Mom about what to do with old cards, I immediately loved the idea. You could put all kinds of keepsakes into an album with just a couple book rings.

This is the album I ended up making:


For the front cover of the album, I created the design in InDesign and included the monogram we used on our invitations. Then I just printed it out on a leftover 6x9 envelope.


I made the front and back covers a little sturdier with a thick piece of cardboard (the backing of a sketchpad) cut in half.


Then I just put the pieces of cardboard in each envelope and sealed it. (Pro tip: If you have self-sealing envelopes, you're supposed to peal the little strip of paper off, not lick it. Not that I would do that or anything.)


I used a two-hole punch to punch all the cards.


I like that you can flip through all the cards and actually feel them, and also that they can be rearranged.


This is one way to make all sides of the card visible. While the backs of most cards are not that interesting, we had one card that was signed on the back since they had written a long message inside. 


One card opens from the top, so I glued it onto a piece of card stock so we could still open it and read it.

I put all of the tiny gift bag cards on their own page by gluing them to a piece of card stock.


The one thing I'm not sure I like is how much the 3" book rings stick out. I wouldn't be able to use shorter rings unless I divide the cards into 2 albums. I might try to find some D-shaped rings or possibly bind it with ribbon. Another disadvantage is that the cards aren't well protected.

Overall, I'm happy with this solution.


What do you do with greeting cards? 

Shared at the Homemaker by Choice blog hop.

January 8, 2011

Fun with The Island of Misfit Ornaments

I decided to check out the Target 90% off Christmas sale today. There really wasn't much left at all. I guess if there's something I really want next year I'd better get it right after Christmas.


It was mostly "The Island of Misfit Ornaments," like this reindeer with one antler.


And...a toaster ornament?


But I did find these partridge and poinsettia ornaments that I really liked. I kind of stared at them for a while in the store, trying to decide what I could do with them, and then bought five of them along with some raffia that was also 90% off


Put them together, and you have a Christmas garland!


I like how it's Christmasy, but not overly so. I still don't plan to keep it up year round though. In fact, it fell down just a few minutes ago since I just had it taped to the window. I'll have to work on a better hanging method when it's time to decorate next year.

Did you find any great buys during the after Christmas sales?

May 12, 2010

Making my card box

You know you're getting down to the last few weeks of wedding planning when you have to get a cart at Hobby Lobby for the first time ever.

...and when your dining room looks like this:


...and you spend your lunch break doing this:


Among my recent Hobby Lobby purchases were supplies to make a card box.


A paper maché box, wine colored ribbon, white tempera paint, and a black 3D sticker.

I used three light coats of paint. This is how it looked after the first coat.


I used an X-Acto knife to cut a slot in the top of the lid. This didn't work too well since the box was so thick, but I smoothed out my bad cutting job with some fine grit sandpaper.


I wrapped both the rim of the lid and the middle of the box with ribbon, gluing it on with a glue stick as I went.


I also made a bow for the top of the box using the same ribbon.


The 3D sticker went on the front..


And voila! 

Including the paint, this project cost me about $8.50. I could have used something cheaper for our guests to put their cards in, but it wouldn't have fit our wedding colors and style this well. I'm really pleased with how it turned out.

April 17, 2010

Paper!


Last week, Nathan and I went on a date to Arvey Paper in hopes of finding some paper to use for our invitations. The great thing about this store is that they have free samples, so you can look at the paper, feel it, and even take it home to print on it before buying it. I only know about this place because we took a fieldtrip here for one of my design classes.

I liked the Classic Crest by Neenah Paper in solar white. I'm not posting a picture of it because, well, it's hard to photograph white paper, and there aren't any good images online either. The Neenah Paper website calls Classic Crest a "subtle embossed finish, like finely woven cloth." Ooooohhhhh...


But then Nathan discovered the Classic Linen in white pearl. In addition to being textured, the surface is sparkly and shiny. It seemed like it would be just about perfect...except for the fact that the word "pearl" doubles the price. This is when the fact that Nathan and I both love paper becomes dangerous. I keep saying that we shouldn't spend money on unnecessary things, especially things that no one else will really care about, but...it's sparkly textured paper!!!

To shine or not to shine, that was the question. We've made our decision, but I won't reveal our choice until I post pictures of the invitations after we've sent them out. (I'm sure the suspense is killing you.) But I was really glad that Nathan got to come with me to look at the paper and help me make the decision. He was more excited than I was, which is why I love him.

What do you enjoy doing with your significant other that most people might not find as exciting? (G-rated only, please)

March 4, 2010

Piecing the Centerpieces: Take 2

When we left off, my centerpieces looked like this:


I've looked into all kinds of other options, but I knew I really wanted to get my hands on a berry garland. Michael's and Jo-Ann's didn't have any in the right color, but on a trip to Hobby Lobby tonight I found this:


Not only was it just what I needed, but it was 50% off! Major win! I also got some silk flower petals that were 50% off, along with floating candles for 80% off.

I cut off a small section and put it into the vase in a spiral along the outside edge. Then I took another sections and spiraled it in the opposite direction. After filling the vase with water and placing a candle on top, I had this:


What do you think? Is this an improvement? I personally love my new version, but I think I'll use a slightly longer section of garland next time to fill up a little more space. I've now spent around $27 experimenting on my centerpieces, but the good news is, I probably won't have to spend much more since I'm borrowing the vases. I'm pretty excited to see how it looks when it's all put together.

February 24, 2010

Piecing the centerpieces

A couple weeks ago, I bought some goodies from Michael's to do a trial run for the reception centerpieces. This was my first attempt:


I filled vases with potpourri and put a candle on top in the center one. The vases would be more spaced out, probably with votive candles in between, and I would have silk rose petals going down the center of the table as well. It doesn't look horrible, but a crooked candle on top of potpourri just seems a little too dangerous.


Even without the candle, though, I'm afraid this just wasn't the best idea for centerpieces. The potpourri I have in my apartment is a year old, so I had forgotten how strong its smell is when it's new. Granted, it will probably fade a little in 4 months, but I still don't think our guests would want to have it right in front of them while they're eating.


It is, however, some nice decor in my apartment. My large vase had been sitting empty on top of my octagonal cabinet since I moved in, and it's looking a lot better now that it has some company. 
 
I can probably still use the potpourri for wedding decor somehow, but it's back to the drawing board for the centerpieces.


This glass filled with letterpress blocks is pretty awesome, but I'm not sure I'd use it for a wedding, although these people did.


Floating fruit could be interesting, if it were in our wedding colors. Do pomegranates float?


I would love to try something with artificial cranberries (and without pink water) if I could just find some. I saw them at Michael's before Christmas, but apparently they're more of a seasonal item. If anyone has ideas on where to find some, let me know.

I think my next step will be to look around as many stores as possible for any craft, decor, or food item that is dark red and could possibly be used in centerpieces. Any ideas?